Unreal Engine 4 Plugin Quickstart
This page will present you with a simple steps you need to take in order to integrate Grail with your UE4 project.
2. Grail and Unreal
To start off, you simply need to put the contents of our plugin in Plugins/ directory inside your project structure.
3. Grail Configuration Loader
UGrailConfigurationLoader class allows us to load a configuration file and store its content in a format understandable for the rest of the plugin.
The easiest way to produce a proper grail configuration file is to use our tool.
To define your own configuration loader instance, simply derive a blueprint class from UGrailConfigurationLoader and fill the blueprint with data (assign a UConsiderationRepository and a UBehaviorBlueprintLoader).
Next, select your configuration file and we’re done for now.
4. Creating AI Manager Actor
AI Manager is an abstraction functioning as a Grail’s motor-power.
It will control its registered entities' thought processes.
But for it to be able to do so, you first you need to place AGrailAIManager on your scene.
The default AGrailAIManager updates entities thoughts and states every frame. If it doesn’t suit your needs, override this class and provide your own logic for updating entities.
|
5. Creating Entity Object
AIEntity is a basic Grail agent able to reason and execute selected behaviors.
We’ve prepared an AIEntityComponent which simply needs to be attached to an actor you wish to make responsible for thinking and taking actions.
The best practice is to attach the component to a Character Controller.
Let’s imagine that we’re making a war game and we’ve already prepared a Soldier Character.
This soldier is supposed to be an autonomous unit, so we need to attach AIEntityComponent to its Character Controller.
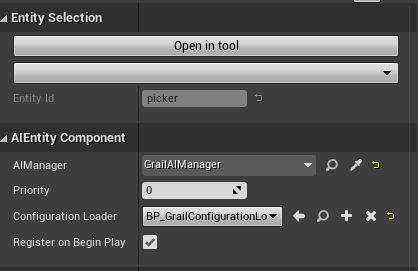
When that’s done, we need to properly configure this component to suit our needs.
First, select GrailConfigurationLoader we’ve created in one of the previous steps and then select one of the entities containted in that object.
After that, you should be able to see imported entity name in corresponding field.
If you’d like to register an entity in a manager, right at the start of the scene, just click the toggle, select the proper manager object and give this entity a priority. Entities with lower priority will be processed before the ones with higher priority.
If you need your physical object to be controlled by more than one entity (for example in a twin stick shooter - one entity responsible for movement and one for attacking) you can follow the above process but using EntityGroupComponent instead of AIEntityComponent and everything should be just fine.
|
6. Providing Reasoner Factories
We’re almost ready to play our scene.
The only thing left to be done is providing our GrailConfigLoader with reasoner factories, so it can create and assign the proper reasoner to each entity.
Depending whether you want to use Grail’s Utility System or other AI algorithms (including Grail’s planners and simulated games) there are different ways to achieve this task.
6.1. Utility Systems
For now let’s assume that we’re going to use the Utility Systems. If you’re interested only in other algorithms, skip to further section.
6.1.1. Implementing Behaviors and Behavior Providers
Continuing our example with a Soldier, we know that he needs to possess the ability to shoot.
To provide him that ability we need to override Behavior class and create much needed ShootBehavior. The best way to learn about this is to read this article.
Following that we need to create our custom UBehaviorProvider.
UBehaviorProvider is an abstract class which requires us to implement InstantiateBlueprint method, which should return properly set up blueprint for our behavior.
As blueprints are a part of Grail’s Utility Systems we also need to initialize it with functions allowing us to properly instantiate behaviors.
Our finished behavior provider should look more or less like this:
UCLASS()
class UShootBehaviorProvider : public UBehaviorProvider
{
    GENERATED_BODY()
public:
  grail::Blueprint<grail::Behavior> ProduceBehaviorBlueprint() const override
    {
        return grail::Blueprint<grail::Behavior>
        {
            "shoot",
            [](const grail::AIEntity& Entity) //create contexts for all possible shots
            {
                std::vector<grail::EntityBlackboardPair> Contexts;
                const auto& Enemies = *Entity.GetBlackboard().GetValue<const TArray<AEnemy*>*>("enemies");
                for (AEnemy* Enemy : *Enemies)
                {
                    grail::Blackboard ContextDataBlackboard;
                    Blackboard.SetValue("target", Enemy);
                    Contexts.emplace_back(grail::EntityBlackboardPair{ &Entity, std::move(ContextDataBlackboard) });
                }

                return Contexts;
            },
            [](const grail::EntityBlackboardPair& Context) //provide logic to create a behavior instance from context
            {
                return std::make_unique<Shoot>(Context.second.GetValue<AEnemy*>("target"));
            }
        };
    }
}
The only thing left is to assign this UBehaviorProvider to an UBehaviorLoader.
| Be sure that you name the created provider EXACTLY like corresponding behavior is called in selected configuration file. Otherwise the plugin won’t be able to properly provide this behavior to entities. |
6.1.2. Behavior Repository
As we now have at least one UBehaviorProvider, we can add it to a UBehaviorLoader.
To do so, first we need to create one.
Right-click on the project window, select Blueprint Class and choose UBehaviorLoader as the base class.
Now, we should insert our UBehaviorProvider into the freshly created UBehaviorLoader.
As that’s done, we can now assign this repository to the corresponding field in UGrailConfigurationLoader.
6.1.3. Consideration Provider
Similarly to UBehaviorProvider we have to implement a UConsiderationProvider.
Let’s assume that for the purpose of selecting the most adequate Shoot behavior we will be considering distance between our Soldier and its target.
We need to implement DistanceConsideration which will should calculate said distance.
After that’s done, we’re going to write a class for DistanceConsiderationProvider and override UConsiderationProvider’s method `ProduceConsideration to return freshly implemented consideration.
Final UConsiderationProvider should look alike this:
UCLASS()
class GRAILPLUGINMVP_API UDistance : public UConsiderationProvider
{
  GENERATED_BODY()
public:
  virtual FString GetConsiderationName() const override
    {
        return "distance";
    }

  virtual std::shared_ptr<grail::utility::UtilityConsideration> ProduceConsideration() const override
    {
     return std::make_shared<DistanceConsideration>();
    }
};
Be sure that the name returned by GetConsiderationName matches EXACTLY the corresponding consideration is called in the selected configuration file. Otherwise the plugin will be unable to properly provide this consideration to entities.
|
6.1.4. Consideration Repository
With a UConsiderationProvider ready, our next task is creating UConsiderationRepository.
Right-click on the project window, select Blueprint Class and choose UConsiderationRepository as the base class.
Now, we should insert our UConsiderationProvider into the freshly created UConsiderationRepository.
As that’s done, we can now assign this repository to the corresponding field in UGrailConfigurationLoader.
6.2. Other Algorithms
If what we need is to provide an entity with custom reasoner we should implement our own ReasonerFactory, create an object instance of this type and pass it to GrailConfigurationLoader.
An example of ReasonerFactory can be found in the code snippet below:
UCLASS()
class UCustomReasonerFactory : public UReasonerFactory
{
    GENERATED_BODY()

    class FactoryInternal : public grail::IReasonerFactory
    {
        TMap<std::string, TFunction<std::unique_ptr<Reasoner>()>> ReasonerCreationFunctions;

        public:
        //...
        Grail.Reasoner CreateReasoner(const std::string& ReasonerID) override
        {
            return ReasonerCreationFunctions[ReasonerID];
        }
        //...
    }

public:
  virtual std::shared_ptr<grail::IReasonerFactory> CreateFactory()
    {
        return std::make_shared<FactoryInternal>();
    };
}